Scenario Designer
Note: This tool is accessible only if your user account is a member of the Administrator
workgroup or the second authorized workgroup for this tool. Administrator users can set the
authorized workgroup using the Access Control button  for this tool
(see Tool Access Control). Also,
your user account must have 'Update' permission for any document that is to be updated using the tool.
If any document is locked by another user, the tool will not be able to access it.
The Scenario Designer tool allows you to add scenarios to existing documents with a bulk update so that you do not need to edit each document individually.
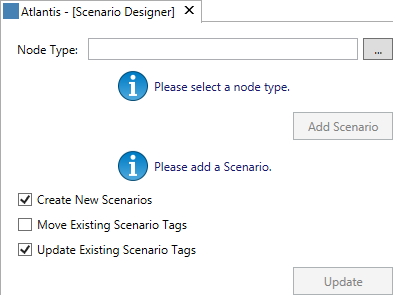
- Select a node in the Dataflow hierarchy and click the Scenario Designer button on the ribbon. You should choose the node which is the top level of the section containing the documents you wish to update. The tool will open in a new tab in the main Dataflow window:
- Click the ellipsis ... button for Node Type to open the Choose Node Type dialog. The list of types displayed are only those that are relevant to the section of the hierarchy that has been selected.
- Click OK to return to the main window. The name of the selected node type will be displayed.
- Define the Variable Category Cases. Do this by clicking the Edit Cases button next to the required category. This will open the Edit Cases dialog.
- Click the Add Scenario button to open the dialog where you can create a scenario.
- You can add more scenario changes by clicking the Add Scenario button again.
- The check box options control how the scenarios and tags specified by this tool will be applied to each document. Check the Create New Scenarios check box if you want a new scenario to be created when a scenario of that name does not exist in a document.
- Check the Move Existing Scenario Tags check box if you want a specified scenario tag to be moved in case it is already applied to a different scenario in a document.
- Check the Update Existing Scenario Tags check box if you want the specified scenario tags to be applied to a scenario in a document, if the scenario has the same name as one of the specified scenarios.
- Click the Update button
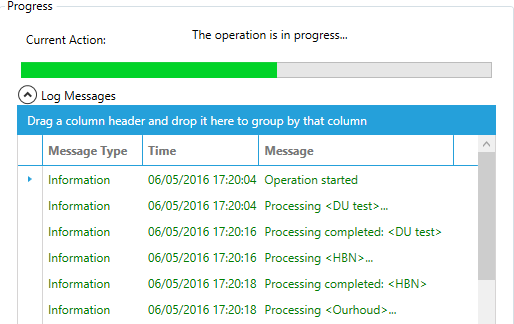
 on the ribbon to apply the new scenarios. The area at the bottom of the page will contain a progress bar
indicating the overall progress of the operation and a log of actions taken. The log will be updated as the process continues.
You can cancel the process at any time by clicking the Cancel button on the ribbon.
 - Upon completion, all selected documents will have the new scenario settings applied.

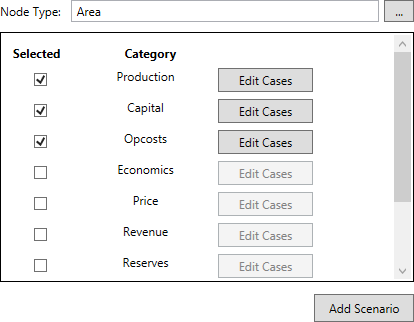
After selection of a node type the variable category list will be displayed. The document template associated with the selected node type will determine which categories are initially selected. For example, in the above screenshot, the Production node type has 'Production', 'Capital', and 'Opcosts' variable categories defined.
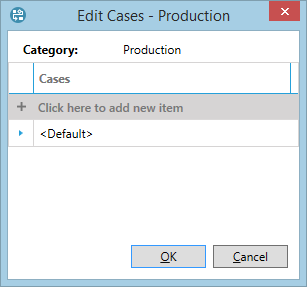
You can define one or more category cases. These can then be chosen when creating your scenario.
Note for versions before 16.5 Update 10: If you do not select any categories/cases at this stage, then when you add or move a scenario tag the scenario cases will be reset to 'Default'. For version 16.5 Update 10 and later you can modify scenario tags in documents without affecting the scenario cases; this makes it easier to use the tool as a bulk editor for scenario tags.
The table below describes the fields in the Add Scenario dialog.
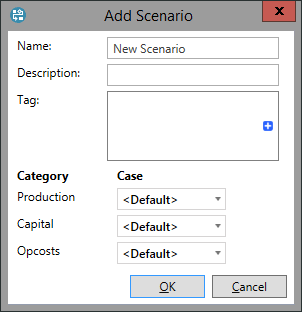
| Field | Description |
|---|---|
| Name | Allows you to enter a name for the new scenario. The name must be unique both within the scenarios listed in the designer, and within the documents you are applying the new scenario to. This will be checked when the update is being carried out. |
| Description | Allows you to enter a description of the new scenario. |
| Tag | Click the + button to display the list of available scenario tags. Clicking a tag will apply it to the new scenario and remove it from the list of available tags. |
| Category | Displays the variable category for which you are specifying the case. |
| Case | Choose a case from the drop-down menu, or leave it as <Default>. Note that the available settings here will depend on the cases that have been added for each variable category. |
